LCGB Forums

The ability to post messages is restricted to LCGB members. Any questions contact us at lcgbadmin@googlemail.com

New project - winter model

LAMBRETTA ONLY PLEASE
Show your Lambretta off to us all with pictures of your pride and joy.

Re: New project - winter model

Postby dickie » Fri Sep 18, 2015 10:23 am

Stevepshipley wrote:Wouldnt dream of telling you guys how to suck eggs. I bought a spanish 200 engine the other year to play around with and learn from that had a badly siezed/rusted top end. Up ended the whole thing in a bucket of diesel for 2 weeks (im not usually that patient) and manged to free it and salvage the barrell.


Steve,

3 things.

1. I'm not that patient either
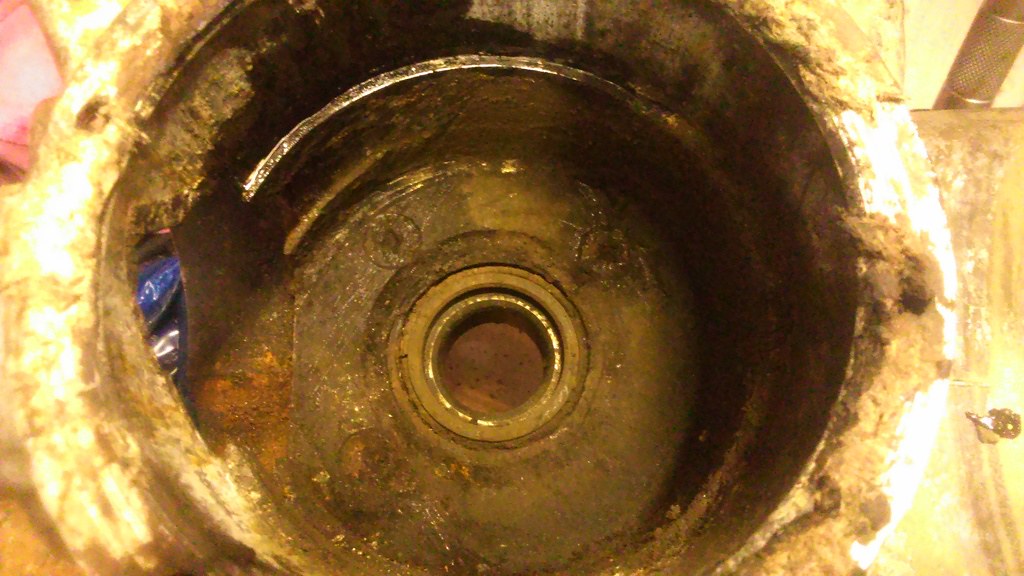
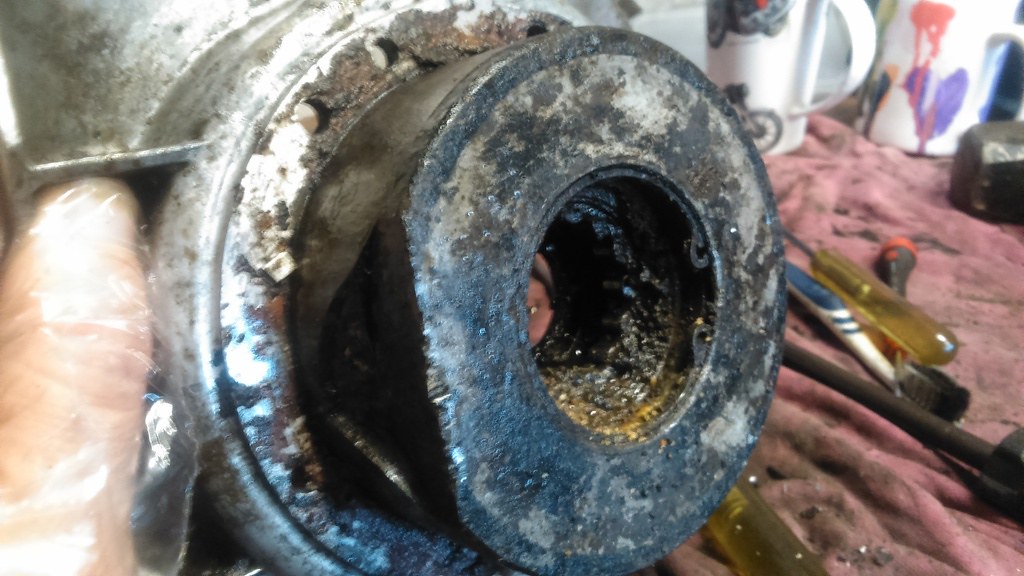
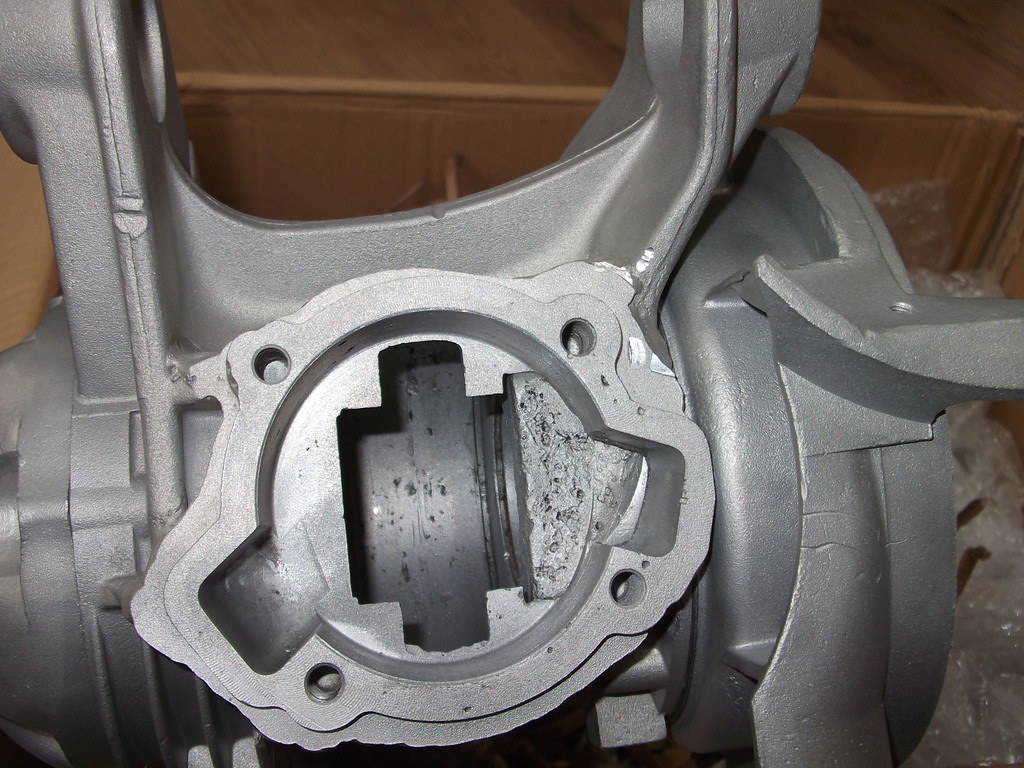
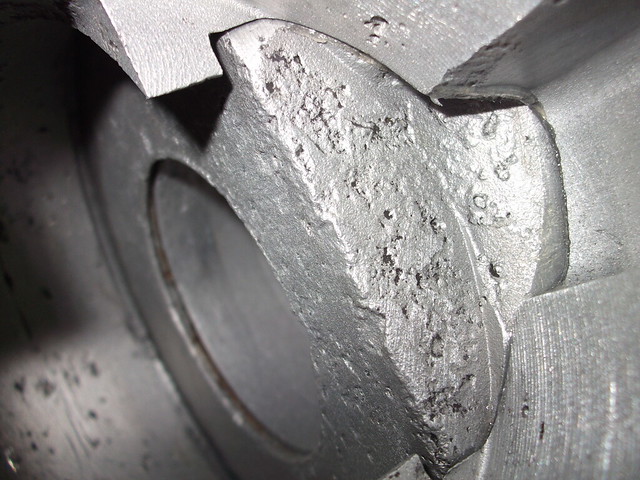
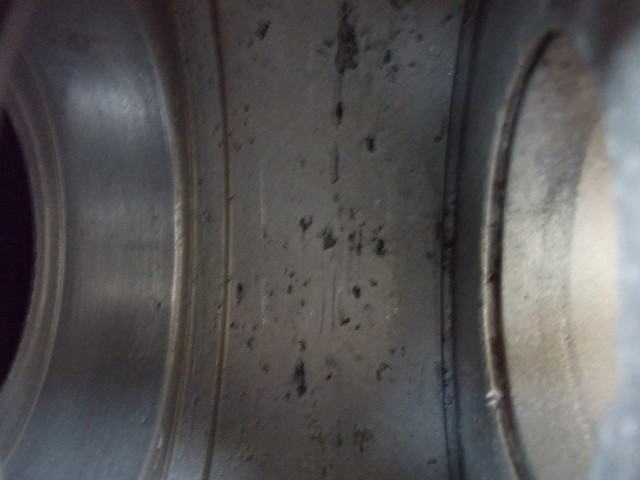
2. I doubt it would have worked anyway; even after I smashed the piston there are segments of the piston skirt adhered to the barrel that won't shift. It was REALLY bad. I guess we'll never know though. You can see bits of piston stuck to the barrel in the photo below.
3. I didn't want the barrel or crank anyway, as they were both rusted to hell.

Image
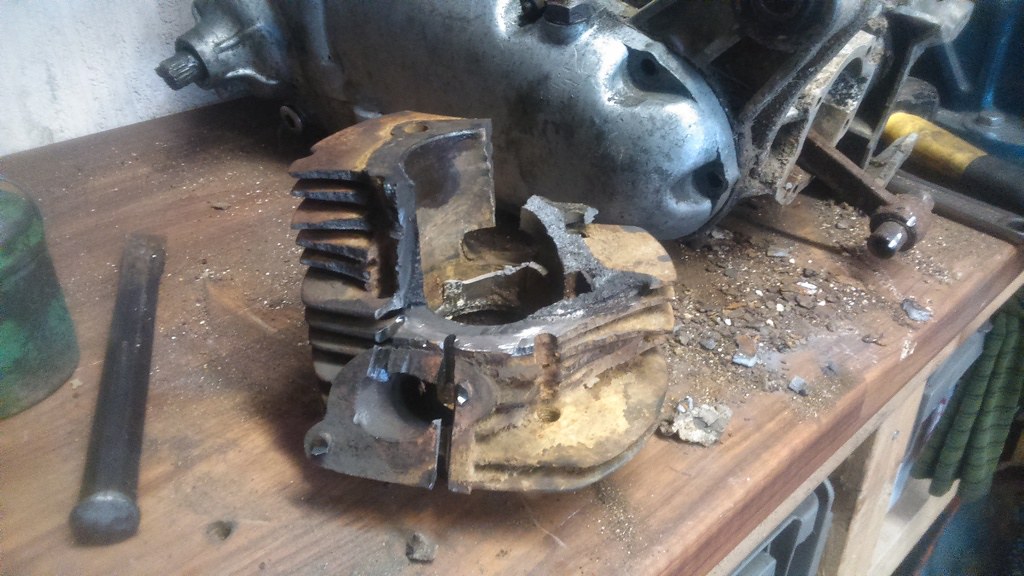
DSC_0062_zpsh0rsuyjz by richardhenderson1968, on Flickr

As it turns out though, I have a spare 150 engine in similar condition and I filled the barrel with Plus Gas about a week ago. I've been surprised that the oil hasn't run past the rings at all yet. I have no plans for that engine at the moment, so I'll just leave and maybe one day it'll be good.
Last edited by dickie on Sat Oct 28, 2017 6:45 pm, edited 1 time in total.
dickie
 
Posts: 1755
Joined: Thu Oct 02, 2014 12:32 pm
Location: Tyne and Wear

Re: New project - winter model

Postby soullad » Fri Sep 18, 2015 11:58 am

Looks fun Dickie
If you fitting a new top end you might need to replace the original head cowling and therefore check clearance on your rear runners under the bridge piece. Also dry build your new floor runner strips as the holes may not line up too.
Keep the pics coming mate ...
soullad
 
Posts: 230
Joined: Sun Jun 01, 2014 8:34 pm
Location: Flying 8 Balls SC. Norfolk

Re: New project - winter model

Postby dickie » Fri Sep 18, 2015 12:33 pm

soullad wrote:Looks fun Dickie
If you fitting a new top end you might need to replace the original head cowling and therefore check clearance on your rear runners under the bridge piece. Also dry build your new floor runner strips as the holes may not line up too.
Keep the pics coming mate ...


It came without a head cowl so I need a new one, but I've decided to fit an Avanti head and cowl anyway. Will this cause issues with clearance?
dickie
 
Posts: 1755
Joined: Thu Oct 02, 2014 12:32 pm
Location: Tyne and Wear

Re: New project - winter model

Postby soullad » Sat Sep 19, 2015 1:42 pm

Probably but as with everything like this, a dry build will reveal all.
soullad
 
Posts: 230
Joined: Sun Jun 01, 2014 8:34 pm
Location: Flying 8 Balls SC. Norfolk

Re: New project - winter model

Postby dickie » Sat Sep 19, 2015 7:53 pm

Had a pleasant leisurely afternoon stripping the rest of the motor and repairing threads.

Just one little job to do now before I send it off to get modified for a ts1 barrel.

ImageDSC_0068_zpsg8poumhj by richardhenderson1968

This looks like it could be fun. :(

I'm not taking any chances with this so it's going into a bucket of diesel for at least a week.
Last edited by dickie on Mon Nov 13, 2017 6:04 pm, edited 1 time in total.
dickie
 
Posts: 1755
Joined: Thu Oct 02, 2014 12:32 pm
Location: Tyne and Wear

Re: New project - winter model

Postby coaster » Sat Sep 19, 2015 9:07 pm

Sweet Jesus that doesn't look like it will be easy :shock: After the diesel use a blow torch and an impact driver, the type you belt with a hammer

Good luck
User avatar
coaster
 
Posts: 2647
Joined: Fri May 30, 2014 1:00 pm
Location: Norfolk, Flying 8 Balls

Re: New project - winter model

Postby Warkton Tornado No.1 » Sun Sep 20, 2015 3:01 pm

Sweet Jesus that doesn't look like it will be easy :shock: After the diesel use a blow torch and an impact driver, the type you belt with a hammer


I don't think those screws will move, but if you have access to a pillar drill you can sometimes fit a long screw driver bit that is very snug & try & wind out the screws that way. If they don't shift, you are automatically centred to drill out incrementally (Ø 5 mm maximum to suit M6)
Warkton Tornado No.1
 
Posts: 2116
Joined: Sun Jan 11, 2015 1:27 pm

Re: New project - winter model

Postby dickie » Sun Sep 20, 2015 6:13 pm

I reckon you're right Mr warkton but I'm going to give it a go with the expectation that I'll fail.

Oddly (to me anyway), the screws have a philips head so that will help when I inevitably have to drill them out, as the drill tends to self-centre.

Anybody taking bets?
dickie
 
Posts: 1755
Joined: Thu Oct 02, 2014 12:32 pm
Location: Tyne and Wear

Re: New project - winter model

Postby Eden » Thu Sep 24, 2015 10:27 am

dickie wrote:I reckon you're right Mr warkton but I'm going to give it a go with the expectation that I'll fail.

Oddly (to me anyway), the screws have a philips head so that will help when I inevitably have to drill them out, as the drill tends to self-centre.

Anybody taking bets?


All the Spanish motors I've stripped have Phillips head screws holding the plate.
I managed to free the piston in the motor I was stripping last week but a skirt came off the barrel with the piston lol.
My drive plate looked very much like yours and with the impact driver all the screws came out.
User avatar
Eden
 
Posts: 986
Joined: Fri May 30, 2014 9:57 am
Location: ILCLAND

Re: New project - winter model

Postby dickie » Sat Oct 10, 2015 8:33 am

dickie wrote:I reckon you're right Mr warkton but I'm going to give it a go with the expectation that I'll fail.

Oddly (to me anyway), the screws have a philips head so that will help when I inevitably have to drill them out, as the drill tends to self-centre.

Anybody taking bets?


I was right unfortunately. Soaked for a week or 2 in diesel, heated up (a lot) and then I used an impact driver which only served to wreck the heads.

So i invested in some 160mm long drills; 3mm, 3.5mm,4mm,4.5mm and 5mm. Amazingly, I didn't snap a single drill! Then I just tapped out what was left. It was actually very easy and when I do the spare engine I have under my bench I reckon I'll just go straight to the drills rather than farting about. It's in about the same condition as the engine I'm currently working on, so I can say with near certainty that they won't come out with a driver.
dickie
 
Posts: 1755
Joined: Thu Oct 02, 2014 12:32 pm
Location: Tyne and Wear

Re: New project - winter model

Postby Warkton Tornado No.1 » Sat Oct 10, 2015 12:54 pm

Then I just tapped out what was left.


I bet you actually just 'cleaned up' the original M6 holes with a tap to get rid of any debris. Quite satisfying, in a way, ensuring some parts are not wrecked!

I hope you have good screws to use in place of the originals.
Warkton Tornado No.1
 
Posts: 2116
Joined: Sun Jan 11, 2015 1:27 pm

Re: New project - winter model

Postby dickie » Sat Oct 10, 2015 1:33 pm

Warkton Tornado No.1 wrote:
Then I just tapped out what was left.


I bet you actually just 'cleaned up' the original M6 holes with a tap to get rid of any debris. Quite satisfying, in a way, ensuring some parts are not wrecked!

I hope you have good screws to use in place of the originals.


Aye,you're right.That's what I meant.

I've a new challenge now which is to get the bearings etc out of the mag housing. This has been in diesel for the best part of a month but still doesn't want to play ball. Not a pretty sight is it?

ImageDSC_0082_zps7crjaqct by richardhenderson1968

I've got some really good circlip pliers and they simply couldn't shift it. So I manged to get the seal out from below the circlip, basically by destroying it. Then I used a small allen key (the largest one that would go through the hole in the circlip) and used it to lever against the mag housing inner face. This worked a treat, but I wish I'd taken a photo as it's a useful tip for someone else but I don't think I've explained it very clearly.

next I cleaned up the inner face as best I could to let the bearing slide out more easily. I heated it up (a lot) and tried to drift it out, but once again, it wasn't budging! Not having much luck,am I?

So I cobbled together a bearing puller from some parts of a silent block tool, then heated the whole lot before applying real force.


This worked, sort of............

ImageDSC_0086_zpsxlvsvli5 by richardhenderson1968

It has left half the bearing behind. I'm not sure how I'm going to get this out, so any suggetsions are welcome. I have a decent bearing puller with slide-hammer, but I doubt that's enough seeing as it has got a good enough grip on the bearing that it has allowed the outer race to yield.
Last edited by dickie on Mon Nov 13, 2017 6:07 pm, edited 1 time in total.
dickie
 
Posts: 1755
Joined: Thu Oct 02, 2014 12:32 pm
Location: Tyne and Wear

Re: New project - winter model

Postby Captain Pugwash » Sat Oct 10, 2015 8:59 pm

Diamond burr will cut through what's left of the bearing, if you can cut it in two places it should fall out. Dremmel time 8-)
User avatar
Captain Pugwash
 
Posts: 422
Joined: Fri May 30, 2014 7:48 pm
Location: Liverpool

Re: New project - winter model

Postby dickie » Sun Oct 11, 2015 7:48 am

Captain Pugwash wrote:Diamond burr will cut through what's left of the bearing, if you can cut it in two places it should fall out. Dremmel time 8-)


For some reason I see using the dremmel as admitting defeat (something probably happened in my childhood).

Regardless I did just as you said: I cut through in 2 diametrically opposite places. Not all the way through as I was trying to avoid damaging the machined face. Once it was really thin I gave it a whack with a cold chisel and it pretty much dropped out.

This has been the least glamorous engine strip in the history of mankind. But I enjoy a challenge and it's over now. :D

I've now got to get the cases off to oiltek to be modified for a ts1 barrel and vapour blasted.
dickie
 
Posts: 1755
Joined: Thu Oct 02, 2014 12:32 pm
Location: Tyne and Wear

Re: New project - winter model

Postby 911hillclimber » Mon Oct 12, 2015 7:47 am

What a bitch!
10/10 for perseverance, great job done.
I too see the dremmel approach as not quite right, but there are times....

Good progress!
911hillclimber
 
Posts: 345
Joined: Mon Dec 29, 2014 1:39 pm

Re: New project - winter model

Postby dickie » Mon Oct 19, 2015 10:16 am

I've been getting parts together for the engine rebuild. I plan to use a SIL GP crank with a Yamaha rod, so I bought this 'genuine' SIL crank, which I will not be using. Look at the bearing surface!

ImageDSC_0092_zps0eezdfau by richardhenderson1968
Last edited by dickie on Mon Nov 13, 2017 6:08 pm, edited 1 time in total.
dickie
 
Posts: 1755
Joined: Thu Oct 02, 2014 12:32 pm
Location: Tyne and Wear

Re: New project - winter model

Postby dickie » Fri Dec 18, 2015 2:59 pm

Got my casings back from Oiltek today.
ImageDSCF0276_zpsozubwqbb by richardhenderson1968, on Flickr

If you look closely you can see a number of voids in the aluminium welding; harmless.
ImageDSCF0284_zpszygdvtzm by richardhenderson1968, on Flickr

ImageDSCF0290_zpskiwnqtoh by richardhenderson1968, on Flickr

Still haven't decided what pipe to use but I've got the extra mount on anyway so if I use a clubman the option's there for me.
ImageDSCF0279_zpseavi2cpi by richardhenderson1968

The recess for the kickstart rubber was missing a large chunk but they've done a good job of repairing it.
ImageDSCF0277_zpsna3y3lfs by richardhenderson1968

If you look back earlier in this thread you'll see the state of the bottom end. It obvisouy had water in for a number of years and oxidised the mag flange and crank case. When it was vapour blasted that aluminium oxide came off leaving these pock marks behind, but I don't see how they'll cause any harm other than being ugly so I'll just use this as I don't want to replace anything I don't have to.
ImageDSCF0286_zps60upyxry by richardhenderson1968, on Flickr

Same thing in the crank case but not as bad as the mag flange.
ImageDSCF0287_zps1rbclxy0 by richardhenderson1968, on Flickr
Last edited by dickie on Mon Nov 13, 2017 6:11 pm, edited 3 times in total.
dickie
 
Posts: 1755
Joined: Thu Oct 02, 2014 12:32 pm
Location: Tyne and Wear

Re: New project - winter model

Postby Warkton Tornado No.1 » Fri Dec 18, 2015 7:44 pm

Those Moon craters that are in the 'bottom end' & magneto housing are not going to harm anything. It depends on whether you subscribe to the theory of crankcase compression being best when it is 'high' or 'low' which, in turn, may be influenced by your choice of exhaust.

Personally, I'd be inclined to dress them a bit as an excuse to lower crankcase compression, especially if you are 'stroking' the crankshaft up to 60 mm or more. That's if you've changed your plans since you showed the dodgy SIL crank bearing journal!

However, I'm intrigued as to the 'step' in the crankcase around the four stud holes & transfers. Have you welded in a packer of some sort, or have I still got double vision?

Excellent work, by the way, as to the weld of the kickstart butt plug hole & the overall finish.
Warkton Tornado No.1
 
Posts: 2116
Joined: Sun Jan 11, 2015 1:27 pm

Re: New project - winter model

Postby dickie » Sat Dec 19, 2015 10:25 am

Warkton Tornado No.1 wrote:Those Moon craters that are in the 'bottom end' & magneto housing are not going to harm anything. It depends on whether you subscribe to the theory of crankcase compression being best when it is 'high' or 'low' which, in turn, may be influenced by your choice of exhaust.

While I understand the basis of each theory, I don't know enough about it to have any worthwhile point of view, so I just ignore it.

Warkton Tornado No.1 wrote:Personally, I'd be inclined to dress them a bit as an excuse to lower crankcase compression, especially if you are 'stroking' the crankshaft up to 60 mm or more. That's if you've changed your plans since you showed the dodgy SIL crank bearing journal!

That dodgy crank wasn't dodgy at all. It was just a machining rag which unusually hadn't blued so looked like it was really part of the crank. I thought I'd try dressing it with a needle file and it just fell off leaving a perfectly decent crank behind.

Warkton Tornado No.1 wrote:However, I'm intrigued as to the 'step' in the crankcase around the four stud holes & transfers. Have you welded in a packer of some sort, or have I still got double vision?
No, it's just that he machines back the first few mm of weld to the factory profile. But you've now got me wondering if I should have got him to leave 3mm extra height as I'm using a 110mm rod

Warkton Tornado No.1 wrote:Excellent work, by the way, as to the weld of the kickstart butt plug hole & the overall finish.
I don't think it's actually a butt plug, but they do work well in that application. :o
dickie
 
Posts: 1755
Joined: Thu Oct 02, 2014 12:32 pm
Location: Tyne and Wear

Re: New project - winter model

Postby Warkton Tornado No.1 » Sat Dec 19, 2015 12:17 pm

Ha Ha! I'm glad you took my comments in the spirit they were meant.

From what I understand, & I'm probably getting this wrong, the extensive welding has been cut back by a machining process that has replicated the original external process extremely well.

I think you've done something like that......

Wow! Presuming the welding hasn't caused distortion, there must be so many crankcases up & down the country (Ahem!) that are 'fragile' ex-racing blocks ported to the maximum & would benefit from that process if it were available & affordable.

What you say about longer rod begs comment, & it also crosses over to primary compression.

Many years ago, before a certain famous tuner broke cover with his radical ideas applied to his own race bike, I had cranks rebuilt with his suggestion of rods intended for a Japanese motorbike. They were 105 mm centres. As ever, with me, this was all about a Group Four Lambretta.

Our 'seat of the pants' dynos all agreed power & it's delivery were better.

However, what I brought to the table was my internal Motoplat that Ray Kemp sold me having rejected it after his trials. He in turn was using it as the result of Terry Shepherd (RIP) advocating it's use. This rapidly advanced from Zero up to about four/five thousand then retarded to about 10 degrees retarded @ ten thousand. It was a culture shock & took some understanding & set up, but the perseverence & belief in it was mine alone.

The drive from the bike was incredible. The punch out of the hairpin on Cadwell's club circuit was fantastic. Far better riders than me would comment upon how they'd chase me down, only to be left in my wake from the hairpin.

But I couldn't bring that engine home in first place.

Now, I know why.

Too high a primary compression that was brilliant @ pumping low down for immense torque (for it's day!) but caused a massive load once the motor was spinning!

After chasing my tail for years, I now use only long rods & do my best to lower primary compression on a race bike & road bike. If the opportunity presents itself, a longer stroke should be applied to the mix as well.......

I hope this insight helps you with your decision making.

Just don't forget the lube when it comes to fitting that kickstart butt plug & it's replacement. Aaah! Lambrettas are so Italian female.
Warkton Tornado No.1
 
Posts: 2116
Joined: Sun Jan 11, 2015 1:27 pm

PreviousNext

Return to Show Your Ride

Who is online

Users browsing this forum: No registered users and 13 guests