Thanks to you guys, I'm making really good progress with the rebuild now, but I am having problems with the wiring of the handlebar switch wires into the headlamp housing junction box and bulb holder.
I already have the four wires from the loom in the headlamp junction box - Black, Brown, Green and Grey - which I've connected to four separate terminals out of the eight available.
The new switch wires and grey casing are far too long as supplied, so I assume they all have to be cut, with some of the cut lengths used between the junction box and the 2-bulb socket.
There are seven switch wires - Black, Brown, Green, White, Red, Blue, and Yellow. I think the Red and Blue serve the main headlamp bulb in the holder, and the Yellow the side bulb in the holder, but which wires do they connect to on the terminal block please?
Also, there is a fourth connecting post in the bulb holder. What goes in here and where to please?
I think the white horn wire from the switch goes onto the terminal block, and another length comes from the same terminal, down the frame tube to the horn connection (where it has a rubber protection over it).
Does all this make sense, and does anyone have photos or a diagram showing the actual terminal block and bulb holder connections with the wires in them?
Many thanks!!
LCGB Forums
The ability to post messages is restricted to LCGB members. Any questions contact us at lcgbadmin@googlemail.com
1955 Model 150D - Wiring in headlamp
14 posts
• Page 1 of 1
1955 Model 150D - Wiring in headlamp
![]() by Big Al » Sun Jan 24, 2021 5:29 pm
by Big Al » Sun Jan 24, 2021 5:29 pm
- Big Al
- Posts: 222
- Joined: Mon Oct 19, 2015 4:13 pm
Re: 1955 Model 150D - Wiring in headlamp
![]() by Big Al » Sun Jan 24, 2021 9:09 pm
by Big Al » Sun Jan 24, 2021 9:09 pm
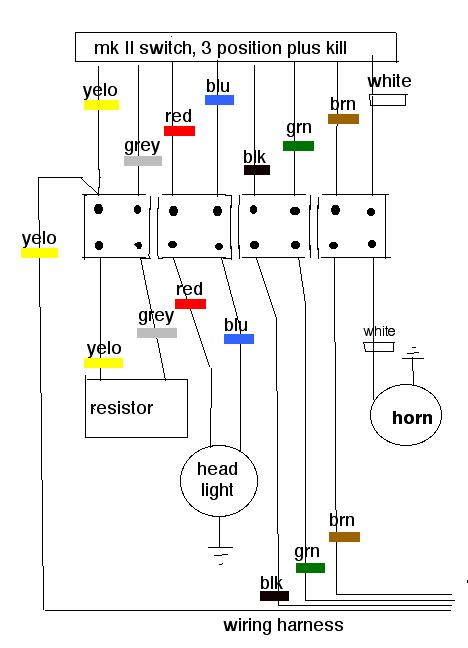
I have just come up with a diagram here for a Mk II switch, 3 position plus ignition kill, Non-battery with brake light: http://www.newtoyouhomes.com/jbsitefold ... nction.jpg
It is part of a website called: Aunt Jonbretta's Tech Recipies for LDs
I think it answers most of my questions, though I don't have a Yellow from the loom, but a Grey. My 150D is non-battery with no brake light, but I was sold a with-battery version and told to ignore/remove the Red and Grey cable to my non-existent Rectifier and Battery. How should I wire up the Yellows and Greys in the headlamp?
- Big Al
- Posts: 222
- Joined: Mon Oct 19, 2015 4:13 pm
Re: 1955 Model 150D - Wiring in headlamp
![]() by jbcollier » Mon Jan 25, 2021 3:35 pm
by jbcollier » Mon Jan 25, 2021 3:35 pm
You are using the wrong harness so colours can't be used to hook things up. Do not pull out or cut off any wires just yet!
First get a wiring diagram that matches what you want to end up with. Next use a multimeter to trace the wires in your new, incorrect harness. You will need "x" number from the front junction box to the engine. "y" number from the engine to the coil. And "z" number from the front junction box to the rear lights. Oh, and don't forget the brake light switch if you have one. Figure out which wires go where and how many you have of each. Will this give you enough wires to match your chosen wiring diagram? Hopefully the answer is yes.
Now compare the colours you actually have with the colours the diagram lays out. Assign colours. Hopefully most of your actual colours will match the wiring diagram but make a note of those that don't. Hook everything up to the junction box, engine, coil and rear light (and optional brake light switch) as per the wiring diagram and your noted colour changes.
Now do the same with the switch.
It's been a while but I did not use many jumpers in the junction box. Power from the engine goes directly into the switch and power to the lights and out to the lights. Horn gets power from the junction box and is grounded at the switch. Ignition feed goes to the kill position.
Now, WHAT WOULD I DO?
Toss the $%#@ wrong harness and buy the right one and all this mess goes away, It will be easy to hook up and easy to troubleshoot years from now. Harnesses are cheap compared to hair you are pulling out now and will also pull out in the future.
-
jbcollier - Posts: 391
- Joined: Sun Jun 01, 2014 2:57 pm
Re: 1955 Model 150D - Wiring in headlamp
![]() by Big Al » Mon Jan 25, 2021 6:13 pm
by Big Al » Mon Jan 25, 2021 6:13 pm
Thanks very much John.
I think it might be simpler than I thought.
I have no battery, rectifier or brake light. This surely means that the Grey and Yellow wires are not needed?
The harness connections to the headlamp junction box are: Green (ignition) and Brown (lighting) plus Black (from the switch via the junction box and out through the harness to serve the tail light).
The switch connections to the headlamp junction box are: Black (to Black), Green (to Green) and Brown (to Brown).
The switch wires for headlamp bulb, Blue and Red, bypass the junction box and go straight to the bulb holder.
The switch wire for the horn (White) also bypasses the the junction box and goes straight to the horn.
The switch wires Grey and Yellow are not used.
What do you think?
As I am not planning to ride the scooter (I'm too old now!) I just want to get everything working properly, and don't fancy taking out the engine and rear mudguard again, with all that entails, just to put another harness in. None of the colours are actually seen anyway once the wiring is in place (except the white horn wire which is normally left unsheathed according to all the photos I've seen in Lambretta books by Vittorio Tessera).
- Big Al
- Posts: 222
- Joined: Mon Oct 19, 2015 4:13 pm
Re: 1955 Model 150D - Wiring in headlamp
![]() by jbcollier » Tue Jan 26, 2021 1:13 am
by jbcollier » Tue Jan 26, 2021 1:13 am
Can you post a picture of the wiring diagram you're using? Or, send it to me and I'll post it.
-
jbcollier - Posts: 391
- Joined: Sun Jun 01, 2014 2:57 pm
Re: 1955 Model 150D - Wiring in headlamp
![]() by Big Al » Tue Jan 26, 2021 11:49 am
by Big Al » Tue Jan 26, 2021 11:49 am
John. That was my main problem. I couldn't find a wiring diagram for the 150D non-battery.
In my Lambretta Servicemans Book 1st Edition, there are four different diagrams, for 150LDB MkII, 150LDA MkI-III Self Starter, 125LD MkI Self Starter 1st Series, and 125LD MkI Self Starter 2nd Series. (You did post a diagram from P.94 of your Book of the Lambretta Motor-Scooter, but that had speedo bulb (optional) and no details of the connections in the headlamp housing.)Added to that, the harness I took off the scooter was hand-made, taped up with black insulating tape and had what appeared to be at least one non-standard colour, so I couldn't follow that.
Perhaps you could confirm one important point about the three magneto terminal connections? I have connected the new harness with the twin green ignition wires to "M", the red wire (for my non-existent parking light) to "2" and the brown wire to "1", (coupling to the blue from the lighting coil inside the generator) as indicated on P.79 of my Book.
I have also connected the single green ingnition wire (that branches off the main harness) to the HT Coil at terminal II under the black rubber cap (with the braided earth wire connected to the bare terminal I) .
Many thanks, Alan
- Big Al
- Posts: 222
- Joined: Mon Oct 19, 2015 4:13 pm
Re: 1955 Model 150D - Wiring in headlamp
![]() by jbcollier » Tue Jan 26, 2021 5:32 pm
by jbcollier » Tue Jan 26, 2021 5:32 pm
Here's the wiring diagram from the 150 D/LD instruction manual:

Here's one with wire colours:

And one with a battery:

Here's one with wire colours:
And one with a battery:
-
jbcollier - Posts: 391
- Joined: Sun Jun 01, 2014 2:57 pm
Re: 1955 Model 150D - Wiring in headlamp
![]() by jbcollier » Tue Jan 26, 2021 5:34 pm
by jbcollier » Tue Jan 26, 2021 5:34 pm
Now, does your harness match the diagram with the battery?
-
jbcollier - Posts: 391
- Joined: Sun Jun 01, 2014 2:57 pm
Re: 1955 Model 150D - Wiring in headlamp
![]() by jbcollier » Tue Jan 26, 2021 8:37 pm
by jbcollier » Tue Jan 26, 2021 8:37 pm
And, your scoot originally did not have a battery?
-
jbcollier - Posts: 391
- Joined: Sun Jun 01, 2014 2:57 pm
Re: 1955 Model 150D - Wiring in headlamp
![]() by jbcollier » Wed Jan 27, 2021 1:41 am
by jbcollier » Wed Jan 27, 2021 1:41 am
Photos of Al's D150 prior to restoration:


All I can say is wow! Mine had been beaten with an ugly stick and trashed as a field bike before I started. I think I ended having to source a used replacement for every body panel and repair the frame as well. I think I have enough info now. Will post tomorrow morning (afternoon your time) on your harness,
All I can say is wow! Mine had been beaten with an ugly stick and trashed as a field bike before I started. I think I ended having to source a used replacement for every body panel and repair the frame as well. I think I have enough info now. Will post tomorrow morning (afternoon your time) on your harness,
-
jbcollier - Posts: 391
- Joined: Sun Jun 01, 2014 2:57 pm
Re: 1955 Model 150D - Wiring in headlamp
![]() by jbcollier » Wed Jan 27, 2021 4:08 pm
by jbcollier » Wed Jan 27, 2021 4:08 pm
Ok, you just need 3 wires coming from the back to the headlight junction box
1) Brown - power from the stator
2) Black - tail light feed
3 Green - ignition (for the kill switch)
If the switch is wired as per original, then:
- brown to brown
- black to black
- green to green
- blue to dip/low beam
- red to main/high beam
- yellow to pilot light
- white to horn
- speedo bulb (if fitted) to black
The brake light switch (only on the rear brake) takes power from the brown wire at the stator) and then back to the brake light bulb.
If you have an extra wire going front to back, use it as an extra ground, always a useful addition.
-
jbcollier - Posts: 391
- Joined: Sun Jun 01, 2014 2:57 pm
Re: 1955 Model 150D - Wiring in headlamp
![]() by Big Al » Wed Jan 27, 2021 6:44 pm
by Big Al » Wed Jan 27, 2021 6:44 pm
Many thanks John.
That confirms what I had worked out last night from your previous comments, and the very helpful wiring diagram "with battery". I had ignored the Grey wire, leaving three wires from the harness to the terminal block. The white horn wire can then use the fourth (and last) terminal on the block.
Great! I will hopefully connect it all up tomorrow.
Alan
- Big Al
- Posts: 222
- Joined: Mon Oct 19, 2015 4:13 pm
14 posts
• Page 1 of 1
Who is online
Users browsing this forum: No registered users and 21 guests