 |
Putoline Oil is an important player in the market for motorcycle lubricants and maintenance products |
Changing your gearbox
Quite involved as apart from the top end, this is pretty much a full engine rebuild. Tools you will require are :- Clutch compressor, clutch holding tool, T bar extractors (or 2x long M6 bolts), circlip pliers, spanners, socket set, screw drivers.
![]()
![]()
![]()
![]()
Scope
To visit our page on gear box ratios, and gearing for performance use, click here
Removal and refitting your gearbox
To start off with these instructions have been pinched from the article regarding changing your clutch, as simply you have to go through every procedure to get to the gearbox. With this in mind is is probably a good idea to change your clutch plates while you "in your gearbox".
Again a pretty easy one, but you will require at least two special tools, the clutch compressor & the clutch holding tool.
First job is to put the new set of clutch corks into a bath of oil use an old saucepan or similar and use ST90 gearbox oil, you can use it later to re-fill your gearbox. If you put dry plates in they will very quickly burn out.
The right hand side floorboard has to come off. One bolt from the bridge piece, two nuts from either end of the outer trim is enough to be able to take this off.
Next also take the leg off that the rear of the floorboard sits on, this has to be done to gain enough clearance to take the chain case side off
Next up is the exhaust, there should be a clamp where it meets the down pipe, two 13mm nuts where the big bracket is, and a smaller 10mm nut at the end of the tail pipe. Some original and most notably the TV exhaust will also have a bolt fixing into the underside of the engine casing, at the rear of the box section of exhaust.
One last thing, you may need a block of wood to tap the exhaust away from the down pipe if the exhaust has not been removed for some time
Now undo all the remaining 10mm nuts to allow the casing to be taken off. If the casing has not been off for a while or a chemical gasket has been used, you may find that you will have to tap (with a rubber hammer) the chain casing to become free.
If you see a small gap appearing and the chain case is still "locked on" a small screwdriver gently prizing the gap larger, working around the whole casing may help. Do not force it though, as damage will occur!
Now your chain casing is free, just unhook the cable and nipple from the clutch arm, you are now ready for your special tool!
There are two main types of compressor available, a two legged one and a four legged one. Either is fine to use, but if you do use the two legged one, make particular attention to the legs being tight onto the studs. The compressors work buy you attaching them to the studs in the chain case, if you use bolts, you may need to find some studs to fit with the two legged type.
Align the tool to make sure that it fits over the centre of the clutch housing (it has a nipple on it), then fix by method as above. You are now ready to turn the centre part of the tool into the clutch.
This is the compressing part of the tool, as the clutch sits on a bed of springs, the springs become compressed. If you look closely, their is a larger circlip ring around the out side of the top plate. With the clutch compressed sufficiently, prize one tip of the circlip out, gently moving round. You will find that is may suddenly pop out, don't worry about this
You can now start unwinding the compressor tool, the clutch will be free and come out. Note how they come out, top plate, cork plate, steel, cork, steel cork etc.!
For the next part you will need the second special tool, the clutch basket holder to do this, it looks similar to a cork and steel welded together. It has teeth both on the inside and out, to hold the basket and housing together without damage. Under no circumstances should you jam these with a different tool to obtain this effect, damage WILL occur.
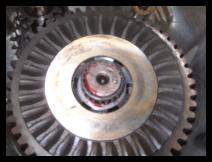
With the tool in position, its is probably time no to switch attention, and remove the rear hub. With the clutch holding tool in position, it makes it much easier to remove the centre hub nut. Back round to the gearbox side of things now, the locking washer that is tabbed over the large centre nut will need to flattened away from the nut. A 24mm socket will be needed with an amount of force to undo the nut. Then simply slide the two housings away. In the centre of the rear sprocket will be a bush or bearing, either a single bronze bush, or a pair or needle roller bearings, inspect, but for the cost of these probably best to replace anyway. Its not that often they have wear and tear, but at least they will not need replacing again for a long while. 11mm nuts secure the gearbox end plate, once these are all undone, you will see two holes that were not used.
Again a special tool is available, but just as good if not better you can use two 11mm bolts. While doing the bolts up to lift away the end plate, gently tap the centre shaft (gear Xmas tree) you can see, this loosens it from its bearing making the endplate able to come away. Another method, but depending on the tightness of the endplate, is to use two screw drivers to prize the endplate up, insert on at each end and "wiggle". Not always a good idea (or easy), but if your stuck it works, again tap the centre while levering the plate gently away.
OK now with the end plate out the way you should be able to see the gearbox. Looking straight at it, the seperate gears to the left, the Xmas tree or gear cluster to the right. Taking the left hand separate gears first, you will notice a shim on top of first gear in the centre of it. This shim controls the amount of end plate float in the gears, important so look after it.
If you look at the centre of the gears, you will notice like the clutch plates, they have cut outs where they locate with the main shaft and the selector. To remove the gears, turn them until free of the selectors teeth, and pull away. Carry on with second third and forth, turn the gears to disengage from the selector.
If you have a look at the gears carefully, you will notice they have two distinctive sides, one with a raised edge on it, important to notice this as the gears do go back together in a certain way round. Last you should be left with your Xmas tree to remove, notice a shim and bearing underneath it.
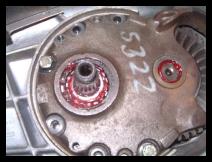
All you are left with now is your selector assembly, and the main shaft sat in its rear hub bearing. Next item is to take apart the selector arm as we can get to this freely now, on the under side you will find a shim, and a bearing. This bearing sits inside a shell, unless the shell is damaged there is no need to take this out. If you do need to, heat the area, and use a suitable instrument to remove.
If you look closely, the gear selector swivel arm has a bolt in it, this secures it to the selector shaft that goes up to the top of the engine. Working from the top and outside the engine, remove the rubber cap (not always there) to gain access to the circlip that holds the arm to the selector shaft. You will find it easier to disconnect the back gear cable and trunnion assembly when remove of the arm comes so do this now. Where the outer arm (goes to the cable) meets the selector shaft, you will either see an 8mm nut and bolt through, or it will be smooth. If a nut and bolt is there, undo this, take the arm that this nut and bolt came out of off. If you have no nut and bolt, fine don't worry, the selector arm will come out when you have undo the nut inside the chain casing by lifting the complete arm up an out. In all cases it is easier to make a mark of the position of the arm in neutral, this will aid you in re-assembly.
The gear selector is probably the part that gives most wear in the gearbox, the most common reason to get into your gearbox, and can cause your scooter to even jump out of gear. When you come to take this out, it will click as it moves up the main shaft into each gear position. This is done by two ball bearings and a central spring running through the centre of the main shaft, with which the balls are forced out onto the arms of the selector. When you extract this selector the balls will shoot off in all directions unless you are ready to catch them, I always lay a rag over my hands and the area so they cannot escape to far. Looking at the actual gear selection spider, the lugs that stick out (or the arms) will have almost certainly become rounded and worn on the very top edges. You can if not to badly worn, simply file these so they become "square" again, or replace.
Now as we took the rear hub off earlier, you can now begin to take the main shaft out. The last item holding this in position, simply use a rubber or nylon hammer and tap from the rear hub end to take out. The bearing should it need to be changed can be taken out by undoing the four retaining nuts on the hub side of the casing, and then remove the two plates, one thinner one is a gasket the thicker a shim. The bearing and oil seal can be tapped out together using a suitable rubber or nylon hammer. Note do not use to much force as you can easily damage the crank casing. Support the casing if necessary with a suitably large solid object.
Re-fitting

The Xmas" tree gear cluster,separate gears, shims and bearings are now going to be fitted to make up the gearbox

Just near the selector arm, in the casing is a housing for the bottom Xmas tree gear cluster, in here goes the needle roller bearing.

On the bottom of the cluster is fitted a shim, the bottom is the widest part.

First into the casing goes the cluster, making sure the shim is still in position when fitted, simply pop the cluster into the needle roller,

On the top of the main shaft, fit the top shim, it fits as in the picture just lay it on.

Next pop on the end plate roller bearing for the main shaft, again just pop it in position

The first gear to go in is forth, this is the smallest gear of all. If you look at the gears carefully, second third and forth have a boss on them, a slightly raised part on one side. This is important as they go in a certain way. Forth gear fits with its highest boss towards you.

After you are happy with forth gear being put in, make sure that forth is level with its counter part gear on the cluster. Next in is third, again check the highest boss, this time the boss faces towards the rear hub. Again check and make sure the gears line up. If they do not, try another sized shim at this under the cluster at this stage

Second gear now goes in, the same way round as third gear, the highest boss faces the rear hub. Again check the alignment as you go.

Notice first gear, you will see on the top face some teeth, these are for the kick-start to mate to when starting, again only fit this way round!
Fit the main shaft shim now, if you are using a totally new gearbox, I would suggest a few shims, 2.0 2.2 & 2.4 should be fine. If you are using your original gearbox and casing, you should be OK with your old shim. If you are using new, fit the 2.2 first and them when can measure up.

Remember the picture above and the shim, we will need it to check endplate float later on. With the new bearing fitted into the endplate, it is held in there by a circlip, fit the end plate, making sure if goes on nice and square. You will need to wiggle it to get the two shafts and bearings, plus all the studs and dowls to line up. do all the nuts up at and even rate to pull the end plate down evenly, continue until tight.

Fit the outer part of the clutch housing, the spider only at this stage, we need to check every thing is tight and secure for measuring the endplate float

Fit the clutch holding tool to secure the main shaft so it will not turn

Again when we fitted the brakes, make sure that either you have a spacer or the rear hub fitted and torque to 120lbs so we can start measuring.

Now we are ready to measure end plate float. This is done by measuring the gap between the shim on first gear to the inner face of the end plate. The gap we are looking for is between 0.07mm to 0.30mm, the use of thicker or thinner shims adjusts this gap.

Instead of the original stud and nut, we have used high tensile steel bolts too secure the endplate. Make sure you get these from a Lambretta dealer as they need to be the correct length. Loctite is also used here to secure these bolts. This method is simpler and quicker. If you are using the original stud method, it is important you take the studs out, check all threads and clean them thoroughly. Make sure when refitting the studs they are put in tight, make use of locktite thread lock. Use the correct nuts and spring washers preferably supplied by a Lambretta dealer as they will be the correct length, and more importantly for the washers, be high tensile.
Secure the endplate with two bolts to start with. Now check the operation of the gearbox, make sure you can select all gears and every things turns correctly.

Now when you are happy with gearbox operation you can continue to fit the rest of the end plate nuts or bolts. Secure evenly and nice and tight.

Fit the main shaft shim washer, the Home Workshop Manual mentions that these shims align the chain, true they do, but unless you have the correct workshop tool for doing this don't worry as if you try to alter the measurements and you get it wrong, you will do more damage then good.
Re fit the clutch housing and spider, making note of either the centre brass bush or two needle roller bearings are in place. Tighten 24mm nut as hard as you can, and re knock over locking tab washer, you are now ready to continue with the clutch.
You can quite happily re-use your old steels, just make sure they are clean, a bit of sandpaper will do this, and not warped. If they are warped or you are unsure of their condition, replace them.
You will need to check that your corks and steels slide smoothly up and down in the basket, if their are any grooves cut into the basket and outer bell, they will need to be filled flat otherwise clutch drag will occur. The last thing to check is the outer housing has two halves riveted together.
Any play in these and again drag will occur, replacement is the only cure
It is probably a very good idea to purchase some new springs they should all be the same height when stood on end, and you should not easily be able to compress them, if in doubt replace them. Some people prefer to refit their clutches with the machine turned on its side to stop the springs from falling out. Fine but if you are worried about the damage to your machine, fuel leaking etc., just simply place a small dab of grease on the bottom of the spring to hold in place.
Line the springs up fit the clutch spider, then a cork, steel cork etc. until you get to the last top plate, which is thicker than the rest of the steels and has a chamfered edge. Now refit your compressor tool, and slowly wind the inner bell down. Still making sure all corks and steels slide easily down into their housing, start re-fitting all the parts.
You will probably find you need to compress further the assembly to be able to get all the parts in. Finally when you have compressed the assembly enough to be able to re-fit the large circlip, do so, but make sure that the two ends of the circlip meet together under one lug of the spider. This merely stops the circlip from being able to pop out!
Undo and remove you clutch compressor, you are now ready to start to refit your casing. The first thing to check is that on some machines you have a little nipple on the clutch inner, make sure this is re fitted. On GP machines their is a brass plunger in the chain case side, again make sure it is in position. You can use a small bad of grease to hold either in position if you are worried about them dropping out.
Re hook up the clutch cable and nipple, although you almost certainly will need to re adjust this later, you can do it anyway! Refit all 10mm nuts, then exhaust, floorboard leg and floorboard, do not forget to refill your gearbox either. A half a litre of ST90 will suffice. If you cannot find ST90, then you can use SAE90, or SAE 85/90, but on no accounts use EP90!
You now need to adjust the clutch. Clearance in the clutch control cable is essential, their should ideally be 1.5mm of free movement between the lever and its housing. Too tight and the clutch will drag and too little the clutch will not release properly and slip will occur.
That's it!